Monday, December 29, 2008

Crocheted Christmas Gifts

Here are some stocking stuffers I crocheted for my siblings.
Experimental towel holder for stove handle. This was before I sewed the button on.
Gryffindor bookmark. With leftover yarn from the Gryffindor scarf I made Rachel several years ago.
Hedgehog screen cleaner for Leonard and frog tongue bookmark for Sumana. I used knots of black and white thread for the face details.

Sunday, December 28, 2008

Late Christmas

Two things in Maggie's stocking and she loves them both.
Practicing her present-opening skills. We hopped into presents the moment we got home from the hospital - you can see she still has her little bracelet around her foot.


Trying out her new carrier (and her new outfit!)
Snuggling her baby doll. She loves watching the eyes open and shut.
Snuggling her Grandpa.

Saturday, December 27, 2008

Merry Christmas?

Here are pictures of Maggie during her hospital stay on Christmas Day and the next two days.

Day 1: Christmas. So fun. (Technically Day 1 was Christmas Eve, but I didn't have my camera lying around on the way to the Emergency Room that afternoon.)
Day 2: Someone is hiding behind the curtain!
Day 2: Opening a present from Uncle Leonard and Aunt Sumana. This present has three "F"s on it - Maggie's favorite letter!
Day 2: Stuffing her with fluids so we can go home already.
Day 3: Feeling better. The nurse brought a play mat and lots of toys since Maggie was finally unhooked but wasn't allowed to leave the room.

Monday, December 22, 2008

Snowy Day

Maggie went outside to play while John shoveled the driveway and I built a snowman that toppled after 3 minutes. I got some cute pictures of Maggie where she looks like she is actually enjoying herself.


This is what really happened:
"Wet!"

Wednesday, December 17, 2008

Play Felt Food and Instructions


For Christmas I made Maggie and Colette each a set of fake food. Colette opened hers today so I'm going to go ahead and get a head start on my Christmas-gift posting.

Most of this was very easy to make. I used acrylic felt which I bought for $2/yard or 25 cents a sheet at Jo-Ann. I spent about $15 on this entire project, and that includes buying a bag of batting I barely touched and plenty of leftover felt. So about $5 for each set. Felt is easy to work with because it doesn't fray or unravel so it doesn't need finished edges. Most of the sewing was done by machine with straight or zigzag stitches. Aside from the chocolate chip cookies, Oreos and donuts, I made:

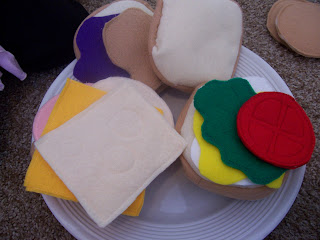
Bread: Cut two cream bread shapes and a long tan strip. I sewed the strip to one bread shape, then most of the way around the other. Then I turned, stuffed with a few layers of batting, and hand stitched the opening closed.
Lunch Meat: ham and turkey. Two circles zigzag stitched together.
Cheese: Two rectangles zigzaged together. I used a straight stitch to add circles to the Swiss cheese.
Lettuce: I cut a lettuce shape out of two layers of green felt. I zigzaged them together, then used a straight stitch to add detail stitching to the leaves.
Tomato: Two layers of a red felt circle. Zigzaged together, then added detail stitching in the center.
Mayo, Mustard, Ketchup, Jelly and Syrup: Cut out blob shapes.
Peanut Butter: Sewed together two blob shapes using a zigzag stitch.
Pancakes: Two circles with a layer of batting in between. Zigzaged together.
Butter: two squares of yellow straight stitched together.
Bacon: I straight stitched two tan strips to a larger brown strip.
Egg: For the egg I used two white blobs and a yellow circle. Stitch the yellow circle to one white blob - before closing the circle, lower the needle and stuff with polyfill. Finish stitching the circle. Zigzag the other white blob underneath.
Pizza crust/sauce/cheese: I am not very happy with how my pizza turned out. I layered an 8 inch tan crush with a 7 inch layer of batting, a 6 inch tan crust, a blob of sauce and a blob of cheese. Stitched around the outsides to hold everything down. Then I stitched the pizza into four pieces in double lines and cut between the double lines. I folded the larger tan crust over the batting and hand stitched it to the upper crust. Each girl got two pieces.
Pizza toppings: These are all just shapes cut out of felt. Yellow pineapple, pink ham, red pepperoni, brown mushrooms, green peppers, and black olives.
Carrots: I cut two long ovals, stitched them with the machine leaving a gap, turned, stuffed and hand stitched the opening closed. Then I hand sewed on two wavy green strips at the top.
Cucumbers/Pickles: I made these the same way I made the bread only without any batting. I machine-stitched a green strip to one cream circle. Then I stitched the other cream circle to the other side of the green strip, most of the way around. Turned through the gap and hand stitched closed.
Banana: The banana was complicated enough to make that I wrote down instructions as I figured it out. The banana was the first thing I made, back in September and I've been keeping it a secret. Finally, I published my instructions, so you can check them out here.

Sack lunch: turkey sandwich with carrot sticks and Oreos.
Sandwich ingredients.

BLT.
Breakfast.
Salad.
Pizza.

I have more felt food planned, but I think it'll wait until the girls' birthdays this spring.

Here are some links I found helpful while planning this craft:
Felt Food Tutorial
Crocheted Food Patterns

Friday, December 12, 2008

Random Cuteness

It's about time to showcase some more Adorable Maggie. Oh, and Leonard visited us.

Posing by the Christmas tree.
Me and Leonard... we match, I know.
Playing peek-a-boo with Uncle Leonard
Tucked into bed. She wanted to play with the pillows while I made the bed.
She loves the camera, what can I say.

Haircut

Ugly
Cute

I got a haircut during Maggie's nap today. I'm not too happy with it. The layers are too short - luckily I knew enough to keep her from giving me a bob in the back (yuck! - not for me). She tried to show me how to style it (using three things I don't have) but when I got home I found my own solution - clippies!

Sunday, November 23, 2008

Family Smiles

Yesterday we went to Draper Park with Erin so she could take pictures of us for our Christmas card. This was a great place to take pictures and the weather was nice for us. We got plenty of cute shots we're not using so here's a sneak peek. Thanks, Erin!


Thursday, November 20, 2008

Wallet #2


I made a new wallet for myself today. This wallet corrects two major flaws of the first wallet I made: My cards don't fall out and Maggie can't open it. Also it is much cuter.

I followed this tutorial (PDF warning) except that I didn't do a vinyl pocket and a keyring and I used a sew-on snap. The lining on the wallet is the same as the lining on the old wallet and on my purse.

T-Shirt

My mirror needs cleaning.

I made a shirt! An actual shirt I will actually wear. Using a $3 sheet from DI and a pattern made from the Harmon's ad. I made the pattern by tracing a shirt I already have. I won't be using that pattern again because the armholes were much too large and I spent forever making the shirt fit me. Next up: a purple shirt for Maggie. And probably another one for me. Lots of material.

Thursday, November 13, 2008

Crocheted Chocolate Chip Cookie


Here are the instructions for the crocheted chocolate chip cookies I made this week. They are really easy if you know how to crochet in the round. No fancy stitches or anything. I made this recipe up myself. The finished cookies are about 2 1/2 inches wide and 1 cm thick. This is a great portable project that can be whipped up in less than 1/2 hour.

Supplies:
tan yarn
darn brown yarn
size G crochet hook
yarn needle

Stitch abbreviations:
Ch=chain
SC=single crochet
DC=double crochet
Sl St=slip stitch
St=stich

Worked in the round, joining.

Cookie (Make two)
Round 1: Using tan yarn, make a magic ring, ch 2, 13 DC in magic ring, join with sl st (14 DC)
Round 2: Ch 2, 1 DC in same st, 2 DC in each st around, join with sl st (28 DC)
Round 3: Ch 1, 1 SC in same st, *1 SC, 2 SC* repeat from * around, join with sl st (42 SC)
Tie off.


Tighten, knot and trim magic ring end of yarn. Pull other end of yarn to back end of cookie. Stack two cookies, front sides out. Thread yarn needle with tan yarn and stitch together through Round 3, starting in between the cookies. If you don’t have a yarn needle you can join using a sl st. Tuck yarn ends inside cookie.

Chocolate chips
Thread yarn needle with dark brown thread. Stitch a chocolate chip by stitching several times in the same area. Tuck thread end in between cookies and stitch over. Be sure to look at both sides of your cookie while making the chocolate chips. Move your yarn to another place on the cookie by sliding the needle in between cookie layers. Stitch several times for another chocolate chip. Repeat until your cookie is chocolatey enough.

This is my own original pattern. Feel free to use it for personal and gift-giving use but please don't sell items made from this pattern.

Friday, November 7, 2008

Modest is Hottest

I've spent the past two Wednesday nights helping with the Young Women. They are all learning how to sew and making skirts. They have to be finished by next week so of course I spent part of today and yesterday finishing the skirt myself.

I'm posting this because I learned how to do a blind hem today. See?
This will come in handy if I ever have to make another party dress for Rachel. I looked at this tutorial for folding the fabric, but what made the difference between getting it right and giving up (a la party dress) was reading the instructions for doing this on my sewing machine. I don't have a manual and couldn't get the download to work when making Rachel's dress, hence the giving up.

I now know how to use four of the 21 feet Mom had for this sewing machine.


The Beet & the Bean Part 2

Maggie is acting like a cat again.

Wednesday, November 5, 2008

Candy Corn Princess Costume

Here is the Candy Corn Princess herself trick-or-treating at Daddy's work. I thought I'd share the inner workings of her $5 costume.

Tutu. I did a separate tutorial for this here.
Candy Corn Trick-or-Treat bag. Felt and orange embroidery thread. I hand-stitched the layers together and then blanket-stitched the sides. I used this tutorial called How to Hand-Sew Felt Using a Blanket Stitch. Get it?
Hair clippie! I made two of these as you can see in other pictures of Maggie in her costume, but this is the cute one. I hand-stitched the felt around a white snap-clip, with the bottom of the clip just poking through the felt.
Here is the Candy Corn Wand - also already posted as I couldn't wait to share it.
Candy Corn Pants - also already posted as I didn't know they'd morph into an adorable Halloween costume.
Put it all together and you've got a lot of cuteness!