Showing posts with label Sewing: Baby. Show all posts

Saturday, April 27, 2013

Girl in Sling

I've only been using the baby sling with Sienna regularly for a week or so, but I am loving it just as much as I did with Dalton.  It's been especially nice because I've been able to get her to nap places she otherwise wouldn't have. (I've tried three times to get fabric at Jo-Ann to make one for Sienna - something girly and new - but I keep getting foiled. Maybe one more attempt before I just order fabric online.)

After taking a nap at gymnastics.


Arms free at the mall.


Asleep at Disneyland.


Asleep at swimming lessons.


Asleep at Disneyland again.

Thursday, March 3, 2011

My Favorite Accessory

My favorite accessory. Can you tell what it is? Here I am wearing it at Cubbon Park in Bangalore, at Disneyland, and in Bryce Canyon.
No, not the cute baby boy. Well, yes, that. My super awesome, fantastic, $6 baby sling. I can't tell you how much I love this thing.
On the coracle boat in Hampi.
I've worn it on planes, trains, and automobiles. And buses, ski lifts, boats, autorickshaws, elephants, hiking trails, merry-go-rounds and Ferris wheels. I've used it to keep Dalton on my lap at restaurants, and as a seatbelt. I've carried Maggie in it, and Kyli when she was so tiny and I had to get three kids out of the house.
Dalton wants out sometimes.
This baby sling has made my life so much easier. Dalton is a bit of a crazy kid. He loves to run off. This keeps him close and gives me a free hand.
Wrapped around Dalton on the elephant.
I think this is the best $6 and 1 hour ever spent. It was so easy to make and has held up great. I use it nearly every single day. It's more comfortable than the Baby Bjorn. It's just like carrying the child on your hip (or piggy back) only hands free.
Daddy tries it out.
Dalton has taken many naps in the sling. Most recently, he fell asleep while waiting for the late-night train in Hampi. The sling enabled me to get both the kids and half the luggage onto the train during the 5 minute stop, barely disturbing him.
Sleepy and snug while hiking in American Fork Canyon.
If you have a baby, this is a must have. Especially if you ever take him anywhere.
Ski lift in Park City.


Saturday, September 4, 2010

Dollar Store Craft: Candy Corn T-shirt Skirt

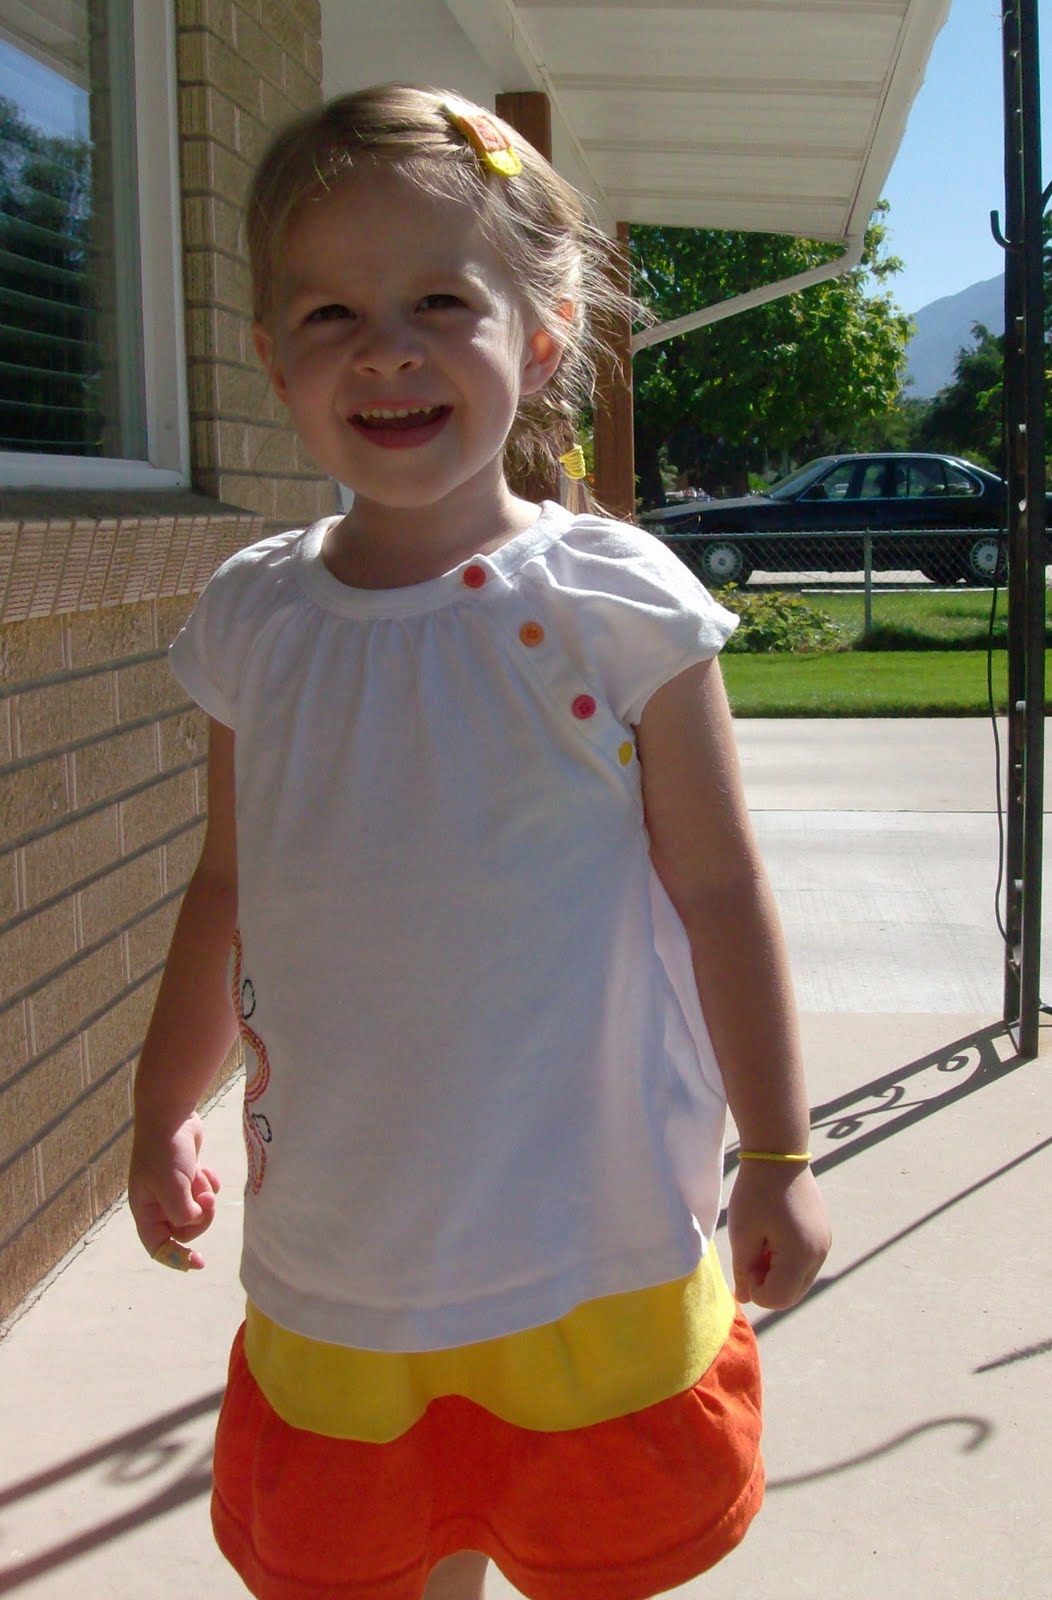
How cute is Maggie in her candy corn skirt (and candy corn clippie), made from t-shirts from the dollar store? We already had the orange adult t-shirt, so the skirt cost me $2, 45 minutes, and a bit of elastic. And it was very easy to make.
One of the great things about sewing with t-shirts is that knit fabric doesn't fray. You don't have to serge or finish your inside edges, or hem the outside if you don't want to.
I used a skirt that currently fits to get an idea of how big to make the t-shirt skirt.
I cut a strip off the bottom of each t-shirt, adding 1/2 inch seam allowance for each seam, plus 1 inch for a waistband. I kept the hem on the bottom of the orange shirt, but trimmed off the others.
Since my strips were already tubes and already in descending width, I just needed to sew them together. This is another great thing about using t-shirts, especially since I had them in different sizes. Otherwise, piece together your strips into a tube the width you need.

To make a gathering stitch, use the longest stitch length you have and leave long thread tails. Do this along the top of the bottom layer (orange) and then pin it to the bottom of the middle layer (yellow) right sides together. While pinning, match the side seams (if any) and the centers of the front and back. Do this before gathering so your gathers will be evenly spaced. Then pull the gathering stitches up by pulling on the bobbin threads, until the fabric layers are the same width. Add additional pins to keep the gathers evenly spaced, then sew. I run the gathering stitches about 1/8 inch from the top, then sew the seam at about 1/4 inch so I can yank out the gathering stitches after sewing the seam. You can see more pictures and description of gathering in my bubble skirt tutu tutorial.
Repeat the gathering steps for the top and middle layers. Sew gathering stitches into the top of the middle layer and pin it to the bottom of the top layer (right sides together!) Pull up the gathers, pin again, then sew.

Finally, add an elastic waistband. With the skirt inside out, fold the top down 1/2 inch and tuck the end under. Stitch right along the bottom edge of the fold almost all the way around. Thread 1/4 inch elastic through the casing by attaching a safety pin to one end. Try the skirt on and pin the elastic where it fits well. Sew the elastic together, trim off excess and finish the casing. Hem the bottom of the skirt if desired.

Maggie LOVES this skirt and wouldn't take it off for me to take a picture. I had to finish the elastic after her bath - then she put it back on and wore it to bed over her pajamas!
This was really easy, quick, and inexpensive to make. So much so I made three more skirts in different sizes using the same t-shirts. Yes, I got 4 skirts out of three $1 t-shirts and a $1 pack of elastic.
And I got to make one in a teeny tiny size for this teeny tiny doll, my 2 month old niece Kyli. I literally used the t-shirt sleeves to make this one! Isn't she precious?
Here are Madeline and Colette trying on their new skirts.
Linked at: Craftaholics and Sew Much Ado.

Wednesday, June 9, 2010

Baby Sling

I wanted something besides the Baby Bjorn to carry Dalton around with in India. I was going to buy a sling when I found a pattern for one online. So, of course I made one instead! I spent $6 on fabric, and it is really quick to make if you understand the directions and have good measurements. I actually like the way it fits with Maggie better, but maybe that's because she isn't trying to dive out of it.
I basically folded my 44" fabric in fourths, sewed the curved seam at 26" (that was my measurement). That's it! Seriously, it's very easy, once you can figure out the instructions. I didn't need to do any hemming, because I sewed the fabric into a tube before hand.

Monday, March 22, 2010

Baby High Chair Recover

I recovered one of our hand-me-down high chairs using this tutorial. I picked out the fabric with Jodi in mind (she told me she had picked out green bedding with elephants and brown trim) since we are sharing this particular hand-me-down (and many others). Technically, Erin wants the high chair back, so thanks to her for letting me ruin it before making it much better.
This high chair had a foam pad (and 10 year old crumbs) in between layers of cracked vinyl. I couldn't find the quilted batting that was used in the tutorial, so I ended up basically recovering the foam pad.

I cut the front off the existing pad and traced around the back to make a pattern. Then I cut out the green flannel and 8 gauge vinyl (wipeable and washable!) for the front and brown fleece for the back. I sewed it all around the pad using bias tape. We are making friends, bias tape and I. I sewed all the layers together at the joints, as in the tutorial. The foam pad had holes in it for this purpose.
I sewed button holes on the bottom flaps to hook around the tabs of the chair. The top part isn't quite wide enough for the method, so I sewed elastic loops onto the sides to hook around the upper tabs. Also, I need to make a belt for this chair. It didn't have one. I'll sew a large button hole for it to hook through, once I get the buckles to make the belt.
The big girl still fits, too.

Friday, December 4, 2009

Appliqued Onesies

I finished up decorating some plain white onesies we bought for Dalton - had to hurry and do it before he grew out of them! I got the idea for the argyle one from MADE. The other ones use clipart, or pictures from freeapplique.com.
For the appliques, I traced the pattern on the paper side of some Wonder Under, which you buy in the interfacing section, FYI. Then I cut it out, ironed it onto the wrong side of the fabric, then cut that out. Then I peeled off the paper and ironed it onto the onesie. Then I zigzag-ed around the edge of the designs.
For the argyle onesie, I cut diamonds from felt and stitched them on with a straight stitch. Then I embroidered the other diamonds. I should have drawn lines with a fabric pen first, because it's a little crooked.

Sunday, September 20, 2009

Baby Rattles

I made two little wrist rattles out of fabric and ribbon scraps. The Peanuts one (from a Leonard boxers scrap so small I can't believe I saved it) is for our baby. The other one, from Wonder Box scraps, is for a friend who is expecting a girl this week. I also made her a pair of baby shoes. The baby shoes fabric is from the wallets I've made.
The wrist rattles were quick and easy to make, other than some hand sewing. Here is the free pattern (PDF).Maggie thinks these are a lot of fun, so hopefully the babies will too.

Saturday, September 5, 2009

More Awesome Dinosaurs

I made a pair of cloth baby shoes using the Stardust Shoes pattern. I used scrap fabric, and stuff I already had, so it only cost me 19 cents for 1/2 yard of elastic and a little bit of interfacing, maybe 50 cents worth, to make them. Not bad considering Robeez and Pediped are around $30!The dinosaur fabric is scraps from a pair of boxers I made Leonard, and I used muslin scraps for the lining. To make the sole I basted together a layer of yellow fleece and a layer of brown felt, both of which I already had.This is one of the most well-made things I've ever sewn, having my iron handy, and following an actual pattern (one made by someone else). It wasn't difficult at all.

Wednesday, August 26, 2009

Baby Pants and Hats

Baby is seriously lacking in the pants department and has zero hats, so I made some pants to go with all the gender-neutral onesies we have, and some hats to keep his little head warm. The pants turned out better than the hats. I was able to get 2 hats and 2 pairs of pants out of a 3XL shirt I found for $3 at DI. I also used about 25 cents of elastic.
I made the pants pattern by tracing pants we bought for baby in sizes 0-3 and 3-6 months. Pants are pretty simple to make following this method, and there a a lot of tutorials for making baby pants. I found this one to be the most helpful.
I used this tutorial and pattern to make the knit fabric baby hats. The pattern is quite tiny and doesn't quite fit with the instructions - or maybe they have a different definition of "5 inches" than my measuring tape. Anyway, I enlarged it, and hopefully the hats will be useful, if not perfectly shaped. The lumpiness is due to my poor knit-sewing capabilities.

Monday, August 24, 2009

Car Seat Canopy

Our Winter-in-Utah baby needs a few things that our Spring-in-SoCal baby did not. A car seat for example. (Maggie's hand-me-down has long since seen it's way to the dump) And a car seat cover. I was going to buy a carseat bunting, but I was inspired by John's cousin-in-law, Hillary, and instructed by this tutorial in making one instead.

I made a few changes so it fit our carseat the way I liked. I made straps out of 14"x2.5" strips of the lining fabric and sewed them 11.5" in from the sides, instead of 10".
The fabric on both sides is flannel, so it can be used as a blanket as well. I tried out one of the decorative stitches on my sewing machine and did a scallop border around the edge.
Hmm. Maybe I should have mentioned that the fabric she was picking out was for baby...

Monday, August 17, 2009

Travel Crib Sheet

I made a sheet for our pack-n-play mattress using 1 yard of cheap-o flannel from Walmart and a bit of elastic. It was easy to make, and would have been easier still if I had noticed I was cutting 6" squares off the corners instead of 4"... Also, the fabric I bought was not 45" wide, but it is plenty big. Problem solved for $3.

Crib sheet instructions
Adapted for portable cribs

Friday, July 24, 2009

Baby Gown


Couldn't help myself and started the baby sewing today. I made this tiny little gown - the pattern said Newborn and meant it. I even enlarged the pattern a bit. Maggie wanted to know where hers was. In a box in the basement being PINK, that's where.